Intro
If you're new to the world of smart contract development, it's essential to understand the basics before you dive in. Prior to creating your first smart contract, it's important to clarify what a smart contract is and what the Ethereum Virtual Machine (EVM) is.
At its core, a smart contract is a self-executing program that is stored on a blockchain. It's designed to automate the execution of specific tasks, and doesn't require intermediaries to facilitate the process. In simpler terms, it's like a digital version of a traditional contract but with the added benefits of being secure, transparent, and decentralized.
Ethereum, on the other hand, is a blockchain platform that was specifically created to enable the development of smart contracts. The platform uses the EVM, which is a virtual machine that executes code on the Ethereum network. It's essentially a sandboxed environment that allows developers to create and test their smart contracts before deploying them on the live network.
Short Disclaimer
It's worth mentioning that this article is intended for beginners, and more experienced developers may not find any new information here.
If you're looking to become a smart contract developer, it's important to have a solid foundation in programming before diving into Solidity and blockchain technology. Specifically, having a good understanding of object-oriented programming concepts in statically typed languages such as C++, C#Java, and Go can be extremely beneficial. Additionally, having knowledge of JavaScript can also be helpful when working with Solidity.
However, if you're completely new to programming, it's important to start with the basics of computer programming first. Once you have a good grasp of the fundamentals, you can explore more complex concepts like smart contract development.
While it can be tempting to jump right into Web3 development, taking the time to learn the basics of programming first can save you a lot of frustration down the road. By building a strong foundation in programming, you'll be better equipped to tackle the complexities of Solidity and blockchain technology, and create more secure and reliable smart contracts.
Preparation Before Creating An Ethereum Smart Contract
Although what I'll say next may seem confusing to beginners, following step-by-step instructions will allow you to create your first smart contract without any issues. Don't get discouraged if something isn't immediately clear, as smart contract development can be a complex topic and it takes time and practice to fully understand.
Ethereum Transactions
An Ethereum transaction is a message sent between two accounts on the Ethereum network, which includes information about the amount of Ether or other assets being transferred, the recipient address, and additional data. Every transaction on the Ethereum network is processed and validated by the nodes in the network, and once confirmed, the transaction is recorded on the blockchain. Transactions can also contain smart contract function calls, which allow users to interact with decentralized applications built on the Ethereum platform. Transactions require a fee in Ether to be paid by the sender, which is used to incentivize the nodes in the network to process and confirm the transaction.
Solidity Language
In order to create smart contracts on the EVM, we will utilize the Solidity programming language.
Solidity is a high-level programming language that is specifically designed for smart contract development on the Ethereum platform. It's similar to JavaScript in terms of syntax and is used to write the code that will be executed by the Ethereum Virtual Machine (EVM). Solidity is a statically typed language, meaning that variables must be defined before they can be used, and it supports object-oriented programming concepts such as inheritance and polymorphism. Additionally, Solidity includes features such as events, modifiers, and the ability to create custom data types.
IDE And External Tools
For beginners looking to create, test, and deploy smart contracts, the most appropriate and user-friendly tool is the Remix IDE web development environment.
Created by the Ethereum Foundation, Remix IDE is a web development environment that offers features such as syntax highlighting, code autocompletion, and a built-in Solidity compiler.
In this article, we will be deploying our smart contract to the Ethereum test network to demonstrate the deployment process. Deploying a smart contract to the Ethereum test network is recommended since deployment on any network requires gas, which has a monetary value.
In order to do this, we'll need to have our own address on the Ethereum network, which can be obtained through the use of the Metamask browser extension, available for Chrome, Firefox, and Brave browsers. (For both my work and this guide, I will be using Chrome).
How To Create A Smart Contract
Step 1: Remix IDE
Once you open the Remix IDE, take note of the four main tools located at the top left of the screen for navigating and working within the environment.
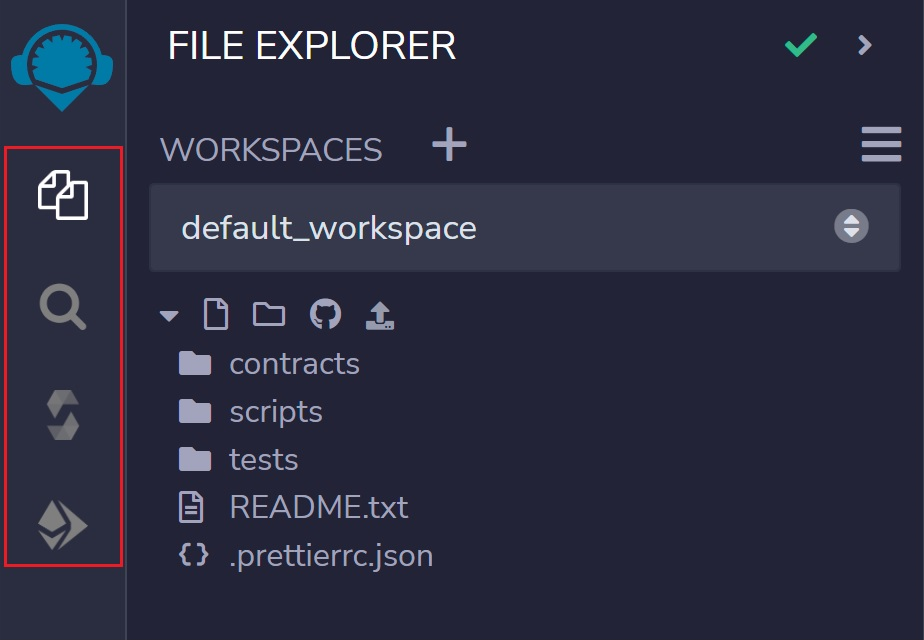
The first tool is the File Explorer, which displays the file structure of the current project and allows for the creation and management of files. The second tool is the "File explorer and search" bar, which allows you to navigate through the file system of your local machine and find specific files within your project. This tool also includes a search function for finding specific text within your files. The third tool is the Solidity Compiler, which compiles Solidity code into bytecode that can be executed by the EVM. And finally, the fourth tool is the Deploy & Run Transactions, which allows for the deployment of smart contracts to the Ethereum network and the execution of transactions.
Step 2: Creating And Compiling Smart Contract
To create a Solidity file:
- Find the "contracts" folder and right-click on it.
- A dropdown menu will appear. Select "New File" from the options.
- A new file will appear in the "contracts" folder. Name the file “HelloWorld.sol”.

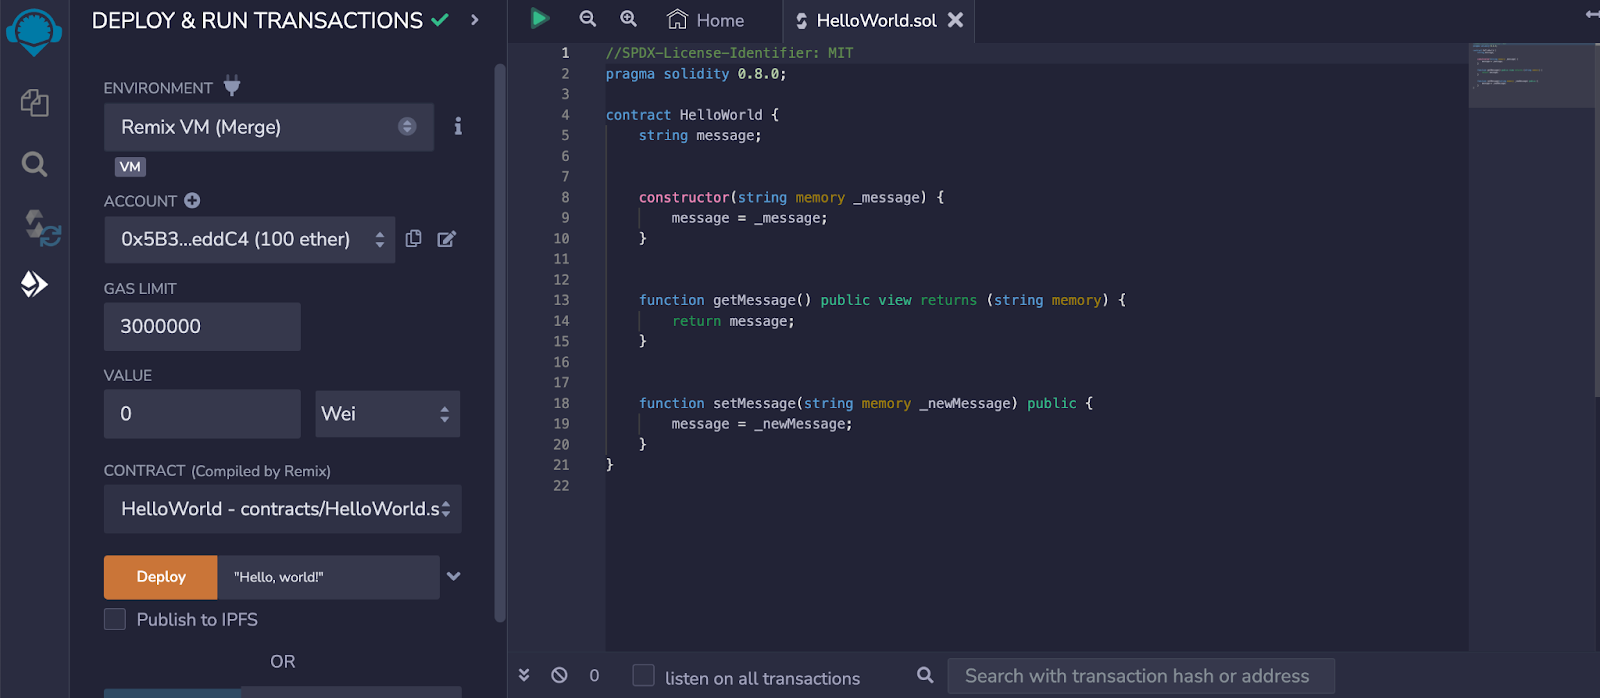
We have entered the code editor, where we will be pasting the following code that we will explain in detail later.
// SPDX-License-Identifier: MIT
pragma solidity 0.8.0;

contract HelloWorld {
    string message;

    constructor(string memory _message) {
        message = _message;
    }

    function getMessage() public view returns (string memory) {
        return message;
    }

    function setMessage(string memory _newMessage) public {
        message = _newMessage;
    }
}
To compile the "Hello, World!" smart contract, open the "Solidity compiler" tool.
- Make sure the correct compiler version is selected. Select "0.8.0" from the dropdown menu.
- Then click the "Compile HelloWorld.sol" button in the main window.
Congratulations, you have successfully compiled your smart contract using Remix and Solidity 0.8.0!

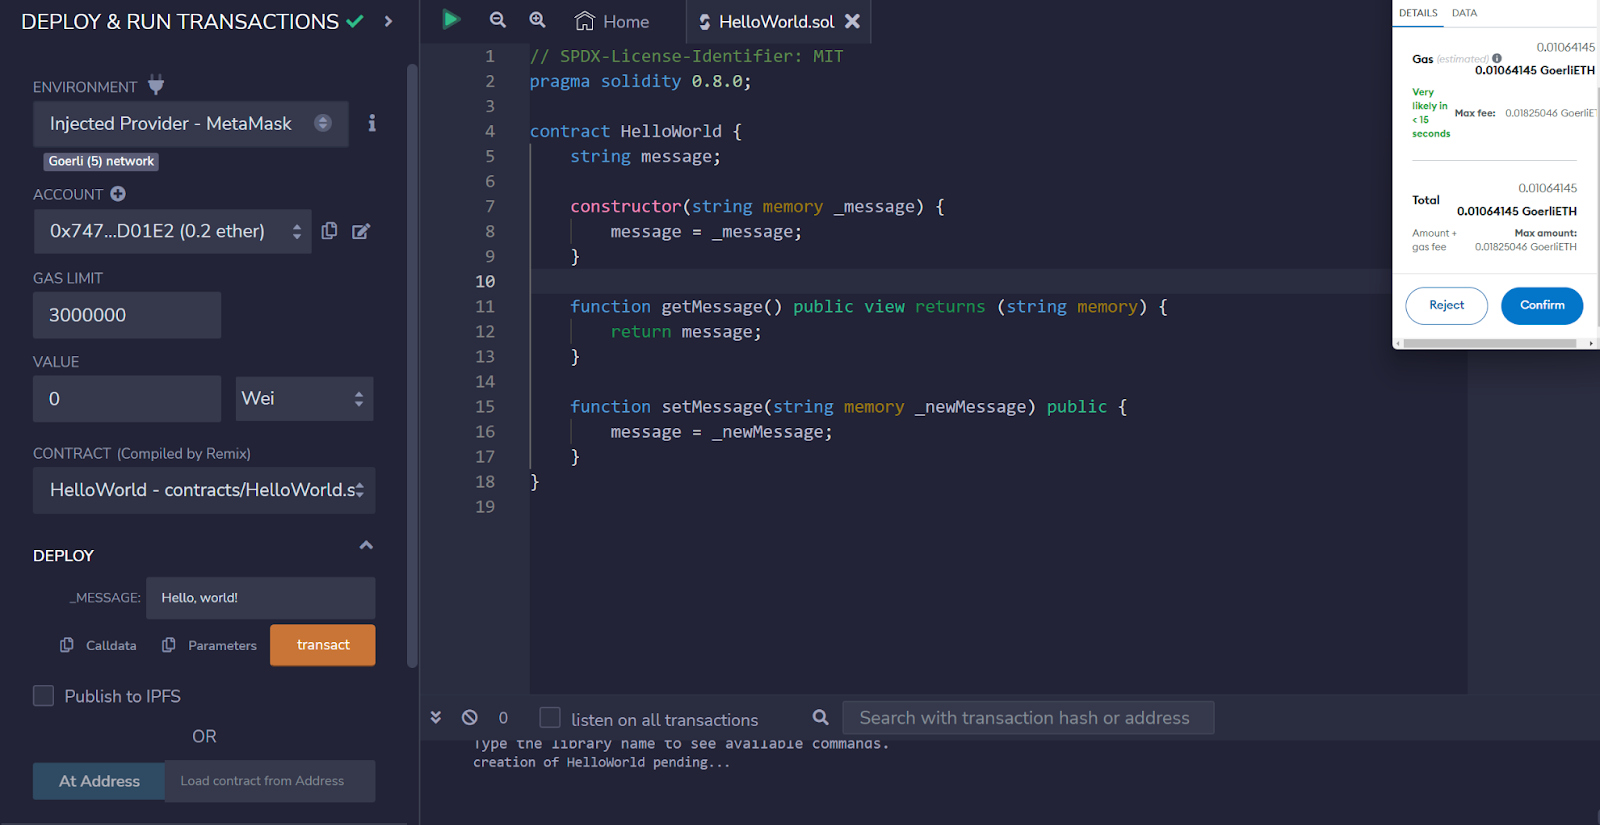
We have one final step remaining, which is to deploy our contract within the local Remix IDE environment. Click on the "Deploy & Run Transactions" icon on the left side of the screen.
In the deployment section of Remix, keep the settings as default and select the compiled smart contract in the contract field, then write a greeting message for your smart contract (e.g. "Hello world!") in the deploy field. Then click deploy.
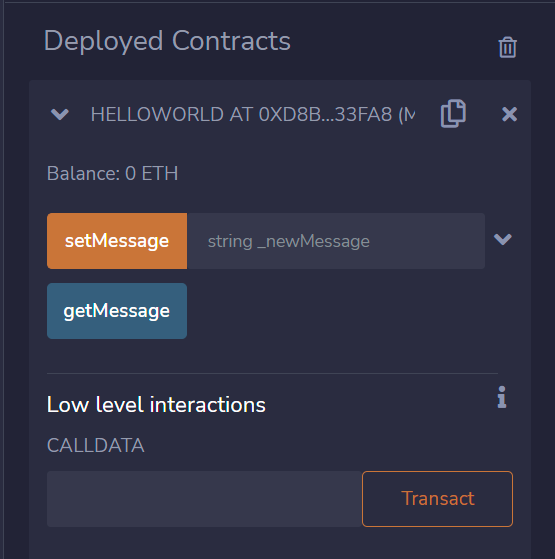
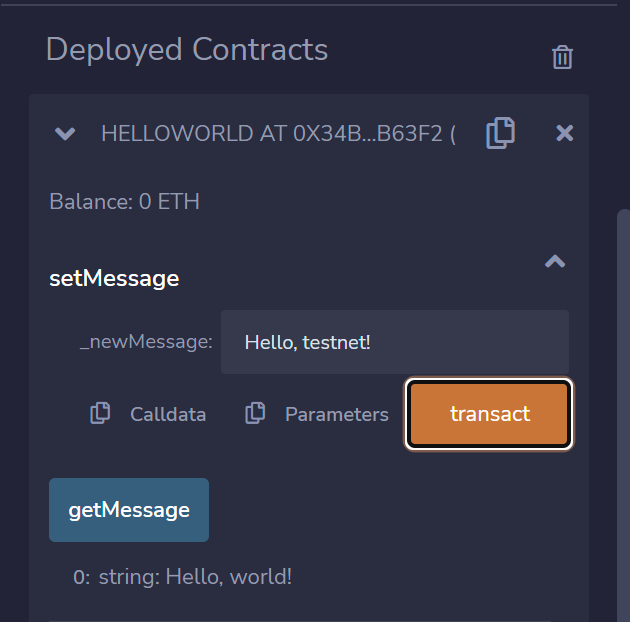
You have successfully created and deployed your own smart contract in the local Remix IDE environment! You can now test the outcome of your work by experimenting with your smart contract's ability to return and change a greeting string. Give it a try and explore its functionality.
Step 3: Code Understanding
This part of the article may be a little confusing for some readers, but as I said, don't worry about it.
Let's go through the smart contract code.
- The first line (// SPDX-License-Identifier: MIT) is a comment that specifies the license under which the code is released.
- The second line (pragma solidity 0.8.0;) is a statement that specifies the version of the Solidity compiler to use. In this case, it's version 0.8.0.
- The next line starts the contract definition (contract HelloWorld {), which is a template for a smart contract on the Ethereum network.
- string message; declares a variable named message of type string, which will store a message that can be retrieved and updated by the contract.
- The constructor function is called when the contract is deployed to the network. It takes a string parameter named _message, which is used to initialize the message variable.
- function getMessage() public view returns (string memory) { declares a function named getMessage that can be called by anyone on the network (public). The view keyword means that the function does not modify the contract's state. This function returns the value of the message variable as a string.
- function setMessage(string memory _newMessage) public { declares a function named setMessage that can also be called by anyone on the network (public). This function takes a string parameter named _newMessage, which is used to update the value of the message variable.
- message = _newMessage; updates the value of the message variable to the new message passed as an argument to the setMessage function.
Step 4: Deployment On The Public Ethereum Test Network
In summary, we have covered the process of creating, compiling, and deploying smart contracts in a local environment. Now, it's time to share our progress with the broader blockchain community! ?
First, let's install the Metamask extension for the browser. Once the installation is complete, you can create a new wallet by following the step-by-step process. It is a straightforward process, but in case you encounter any difficulties, you can always refer to the official guide for assistance.
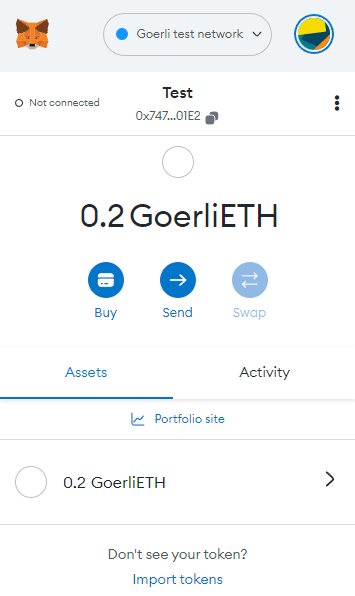
Once you have created and opened your Metamask wallet, you will be presented with the following image.
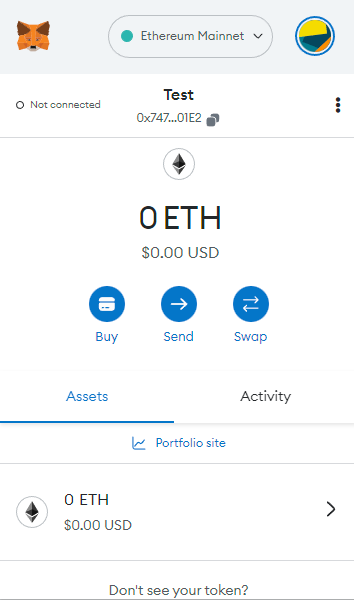
At the top of the window, you can find your address on the network and observe that your balance is 0, which is expected since this is a new account. Additionally, you can see that your Metamask is now connected to the main network of Ethereum. Since transactions on the Ethereum network require a certain amount of ether to be paid as fees, we will be using the Goerli test network to avoid spending real ether.
To display the test networks in Metamask, you will need to go to the “Settings” section, click Advanced, and turn on the “Show test networks” option. After that, click on the network button and select the Goerli testnet.

To obtain test ethers to pay for transactions on the test network, you'll need to receive some native coins. One way to do this is by using a Goerli faucet. You can find one easily using a search engine. As an example, I use this faucet.
Now we have some amount of ether on the balance and we can start deploying our smart contract.
Open the “Deploy and Run” utility in the Remix IDE. In the Environment field, choose the Injected Web Provider option. This will trigger a Metamask dialog box, where you will need to confirm all actions. Make sure to select the correct account in the Metamask extension before proceeding.

We will follow the same steps as before, but this time we need to confirm each transaction in Metamask.
You have successfully deployed your smart contract to the testnet. To view the transaction's result, you can utilize Goerli scan, a dedicated service that monitors all addresses and transactions on the network. By entering the hash of your transaction into the search bar, which can be found in the Remix console, you can view the details and track the status of your transaction.
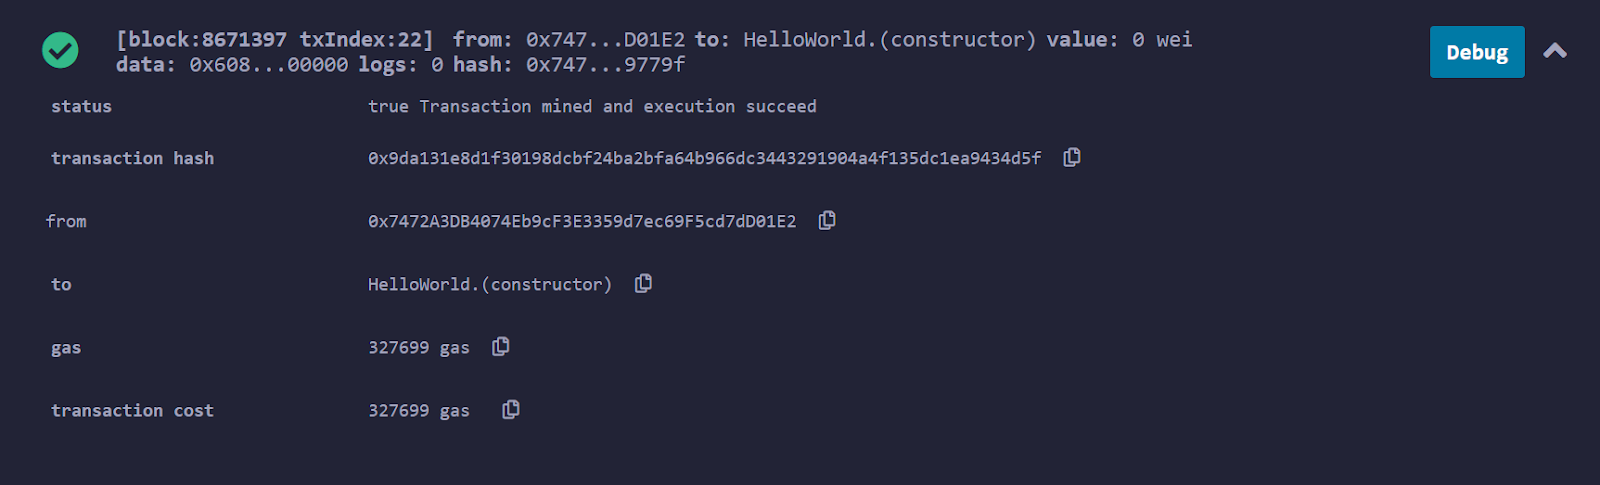
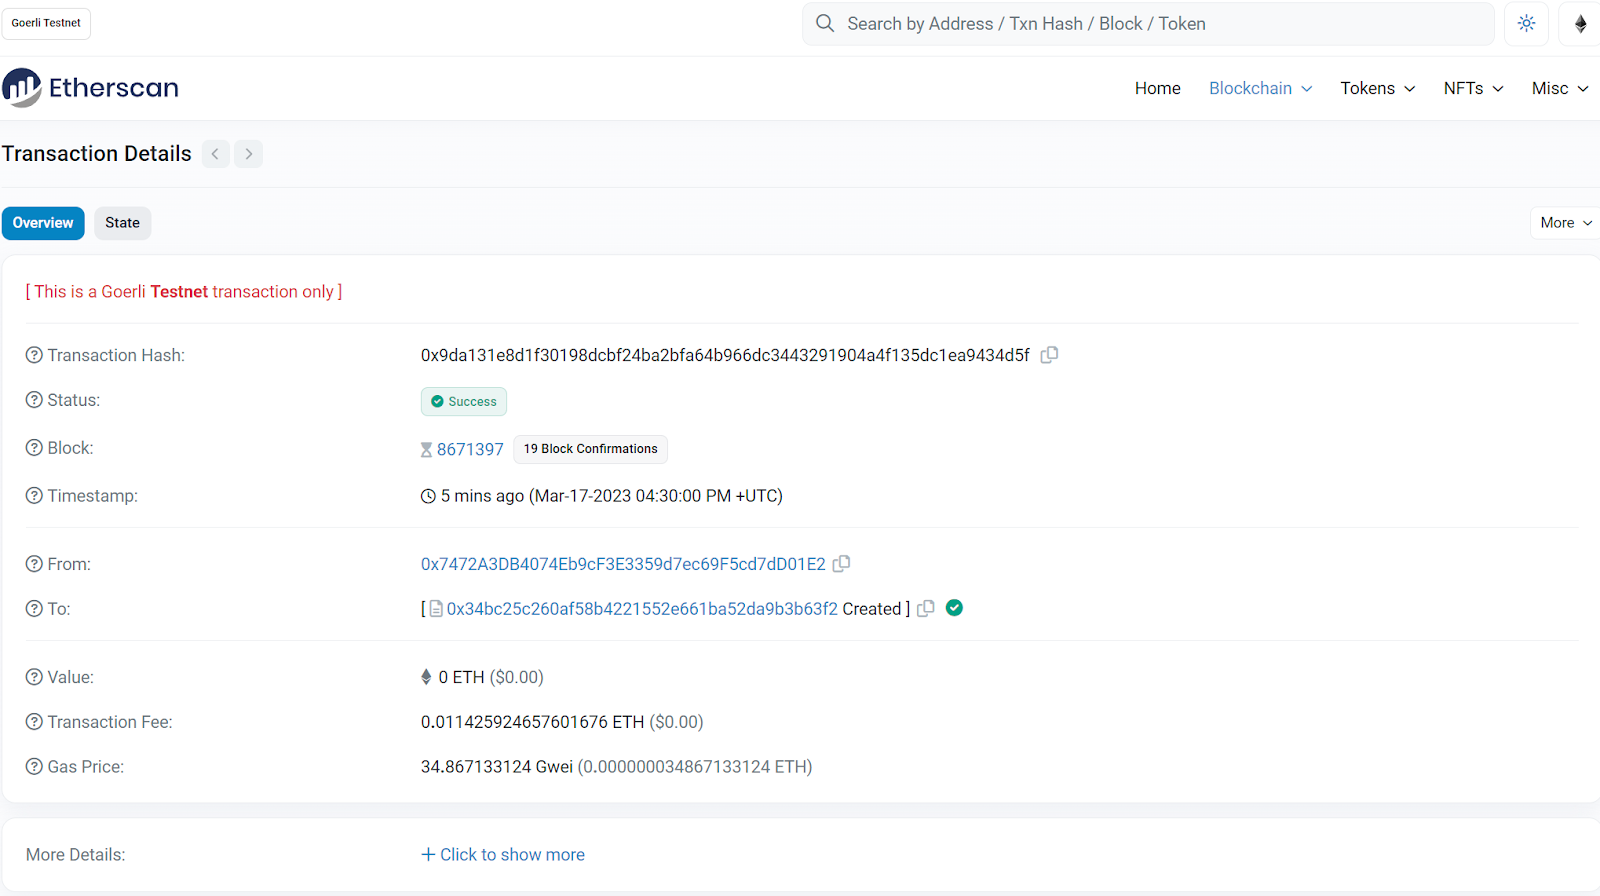
When you view a transaction on Etherscan, you can see various information about that particular transaction:
- Transaction hash, block number, gas used and gas price, sender and recipient addresses, amount of Ether or tokens sent, and timestamp.
- Status of the transaction (whether it succeeded or failed), and any associated contract events or internal transactions.
- Transaction input data, which can include function calls and parameters for smart contract interactions.
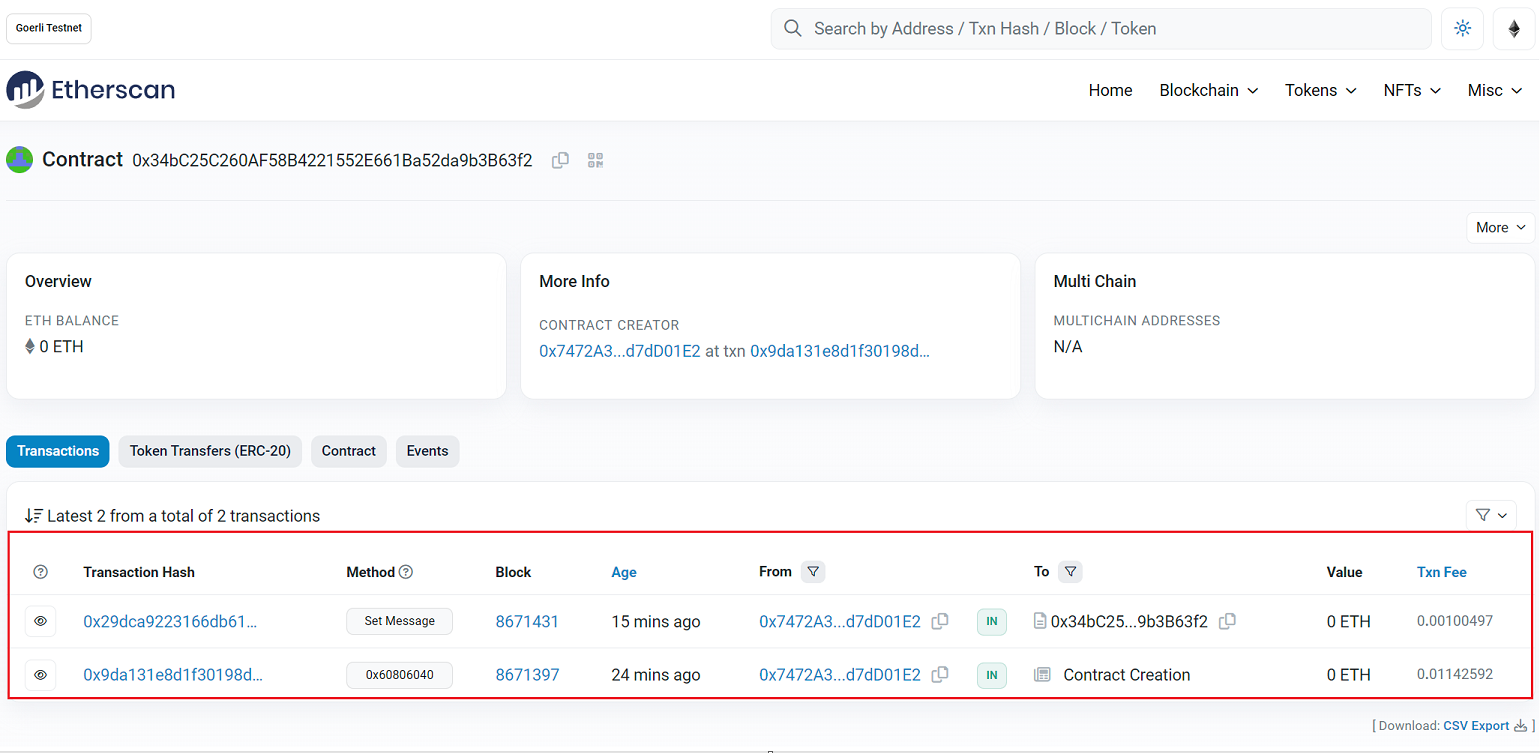
As an example, you can see two transactions executed by a smart contract - one for its creation and the other for setting a new message value.
Congratulations on successfully deploying your smart contract on the public network!
Disclaimer
Please be aware that your smart contract now has an address, which means you can find its information on the scan, including its transaction history, balance, and creator.
Additionally, note that whenever you call a function that sets a new value for a variable, you will need to pay a fee each time, but reading that variable is free. The reason for this is that reading data from the blockchain requires much less effort than writing data to the blockchain.
Testing And Debugging The Smart Contract
This article will not cover the proper way to test and debug smart contracts as it is a complex topic that deserves a separate article. However, beginners can still test their smart contracts on test networks, experiment with input parameters and methods, and execute transactions with different parameters to gain hands-on experience.
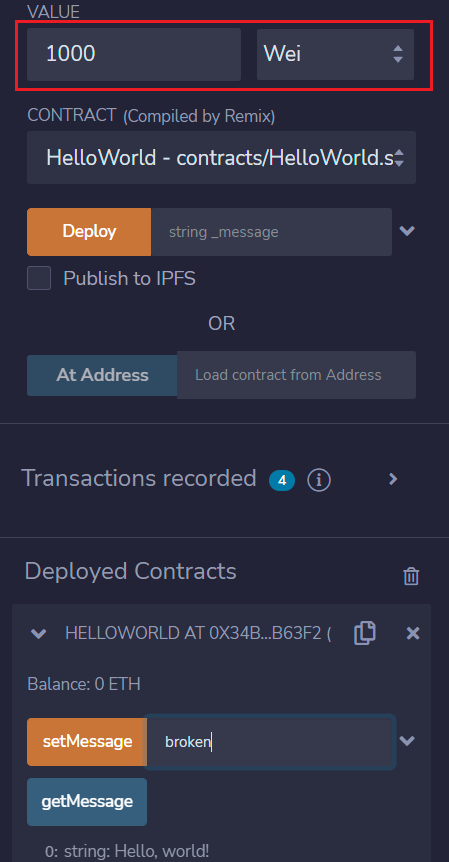
Let's attempt to cause a failure in setting the value of the message variable by breaking down the transaction.
To induce a failure in setting the value of the message variable, we will try to break down the transaction by adding some ether to it and sending it to the contract. To achieve this, we will set the value field to 1000 and choose wei.
Try to make a transaction, we will see the following warning.
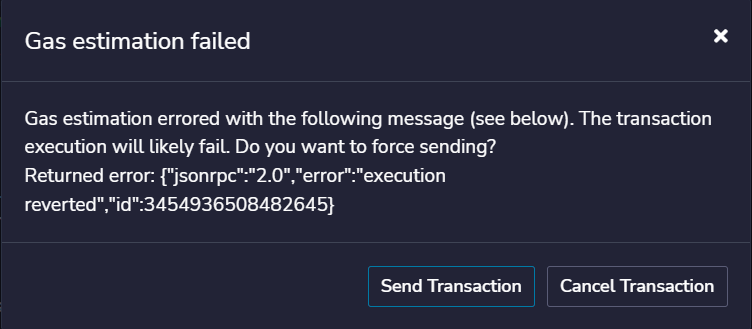
Even if you force a transaction, you will still receive an error, as our smart contract cannot accept ether in its balance.

This method helps to identify the scenarios where the smart contract fails to execute a transaction. As a homework task, it is recommended to determine the maximum length of the string that can be set as a variable in the smart contract. This is a tricky one ?
Conclusion
That's a wrap for our article! We've covered the essentials of creating and deploying a basic smart contract on the Goerli testnet, equipping you with the fundamental knowledge to pursue your path as a Web3 developer. This experience is an excellent foundation for a successful beginning.
If you're looking to expand your understanding of Solidity, be sure to consult the official documentation. Wishing you all the best in your journey!